

From 4 to 5 lines.
Many kites are equipped with a fifth line (5th line). The fifth line system offers many advantages for both novice and advanced kiters.
Some benefits opposite the 4-line system
- Restarting your kite from the water will be fun to do instead of endless swimming.
- Especially for beginners it is very convenient that after activating the safety system, the kite comes out of the water without any difficulty. This also offers advantages for advanced kiters who want to sail unhooked.
- The kite can be further debunked (depowered).
Some cons opposite the 4-line system
- Slightly more rigging work.
- Materials wear out faster.
- Spend more time adjusting.
The kites have even been adapted for the system. The leading edge (thick tube) has been made a lot thinner because the 5th line keeps the kite in shape.
The system also works fine with older kites, but then a solid attachment point (pump leash) must be attached to the kite. If not, it can be set up by various shops and kit repairers.
As you may have already learned, the fifth line system can be pricey to purchase when purchased separately. From now on you have a building description here so that you can make the system yourself fairly easily for a small price!
Count on it that it will take you 4 to 5 hours to make the system, including purchasing the necessary materials. The costs are approximately 50 Euro.
Material list
- Bar / lines (27 m. Or longer, not shorter than 24 m.)
- 21 meters of Marlow rope 2.5 mm. or 3 mm. thickness
- Sleeves. 1.5m, to run your lines through
- Thick darning needle for the sleeves or sleeve needle
- Sewing machine (hobby machine works fine)
- Sewing thread, preferably bought in a kite shop
- 4 stainless steel rings, for sale at water sports shops
- 2 T-wraps to attach a ring to your depowerloop
- Elastic to make a stretch cord
- Stopper ball (photo 9)
- 30 m tape measure.
1. The stretch cord
We will start by making the stretch cord. First stitch a loop on a piece of marlow 2.5mm. Then run a piece of elastic through the piece of Marlow with a sleeve needle. Make sure that the cord remains in place by, for example, a knot or stitch it on the sewing machine, make sure that it has a stretch of 35-40cm.

2. Calculate dimensions
Now measure the control lines from the bar, so including leader lines. Make sure you always have enough space on your leaderlines to adjust your steering lines! Place it on the middle button when measuring.
Now measure the depowerstrap, measure your depowerstrap if it is at full power, and measure from the point where the bar meets the knot to the knot where your powerline is attached.
You need these dimensions to calculate the other dimensions.
- A = Control line measured from bar
- B = Thick Power Line = AED-15cm (don't understand but just do it, experience shows that this size is correct)
- C = 5th line = B + E - F -3,05m
- D = 12.98m if the lines are 27m or longer. For example, if the lines are 25m: 25: 2-1 = 11.50m.
Another example, the lines are now 24m: 24: 2-1 = 11m. I would not use lines shorter than 24m. - E = The Powerstrap, measure it with your strap fully open, and measure from the point where the bar meets the knot to the knot where your powerline is attached.
- F = Stretch cord .. You will have to measure this after you have made it. (measure stretched)
- G = You only determine this dimension at the last when everything is put together in step 7!

3. Now carefully tailor your lines.
Just a trick: If you put the line exactly at 12.98m, for example, you can no longer see the line afterwards because your sleeve is over it. The most convenient is, for example, to continue the line 12cm and then cut sleeves of 24cm. If you slide it over the sleeve, the line will be at the end of the sleeve.
4. Stitching the loops
Now stitch the loops behind the sewing machine! The strength of the stitching is not very important, because there is little force on it.
No sleeve is required for the thick power line. With the regular lines, of course!


With the middle line of 12.98m (D) it is wise to use an extra long sleeve, this will greatly reduce the chance that your line will wear out.

Now make two loops in your marlow power line from a piece of old dyneema using a sleeve needle and stitch them together. Make sure you place them at least 4.5m from the ends, otherwise the safety system will not work. This is to keep everything looking neat in the air.

5. Ring on the power loop
Now, as you can see in the picture, attach a ring to your depowerloop. Pull it tight, otherwise it may slide. Pay attention to which side of your loop you attach it to (with the naish loop it can cause problems if you attach it on the wrong side). Activate your safety system and see if it can still run smoothly.

6. Assembly
Now you can put everything together. Note: It is important that the marlow power line is absolutely not crazy. So run it a few times and make sure that there are no twists in it, otherwise the system may malfunction later! The same goes for line C.
Pass line C through the loops you made in the marlow line.

7. Size determine stretch cord
Now attach the stretch cord (G) to line C. Take your last few meters of marlow, attach it to the other side of the stretch cord. Add the stopper right away. At this point the bar stops after activating safety.

Now pass the line through the eye of the bar. And through the ring on your depower loop.
Now attach the middle line D to a sturdy post.
Make sure your strap is open (full power). Pull your depowerloop tight and pull the 5th line tight and now put a line on the line where the line the ring comes out. That is how long the 5th line should be. Depower your strap and you will see that everything stays fairly tight. If not, you will not have enough stretch on your stretch cord.
Now make a loop so you can attach your leash to it.

8. The nose line
Now we only need to make a noseline. Make this long enough, about 5m is certainly long enough. Stitch a loop on one side. Slide a sleeve over the other side. You can put buttons in it to adjust it.
9. Finishing and adjustment
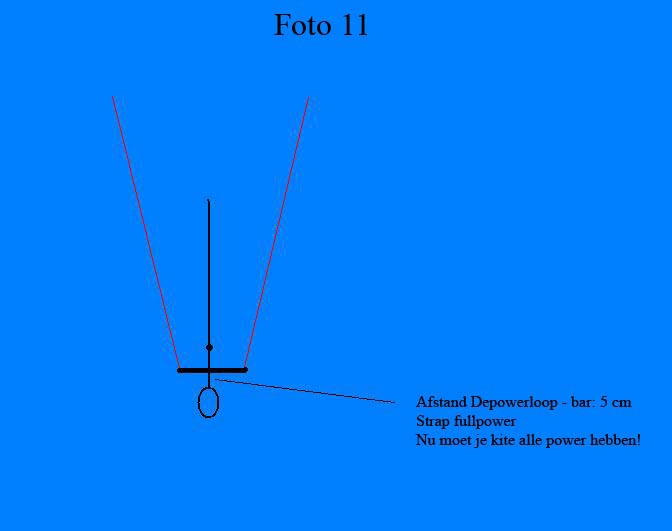
After everything has been made, a few things will also have to be adjusted. First we adjust the steering lines. Make sure your kite has maximum power when you have the strap fully set to full power and have pulled the bar up to 5cm! The kite may not be stored now (flying backwards or very slowed down).

Adjusting the noseline is a tricky part. Everyone has different preferences for it. I like it when the noseline is not too tight. If you pull the bar towards you you will see that the noseline will hang looser, this is no problem.
My adjustment: I put the depowerstrap on full power. The bar against the knot under your depowerstrap. Now the noseline is just tight on me. So if I pull the bar 5cm it will hang loose.
If you tighten the noseline you will see that you have more depower and that the kite steers a bit lighter. I miss the feeling of the kite when it is too tight. But that is your preference!
Good luck in creating your own fifth line system!

This is a Naish / North setup with a so-called shallow Y junction (approx. 13 meters). That works less well on kites from Slingshot, Airush, Gaastra, Wipika and Carved, among others. Those kites are designed on a so-called deep Y of 19-20 meters… and often also fly four-line.